Element SDK
QFPay’s Element SDK enables merchants to build customised checkout experiences using secure, prebuilt payment components hosted by QFPay.
It provides flexible front-end integration while keeping payment processing secure and compliant.
This guide explains how to integrate the Element SDK into your website or application.
Integration Flow
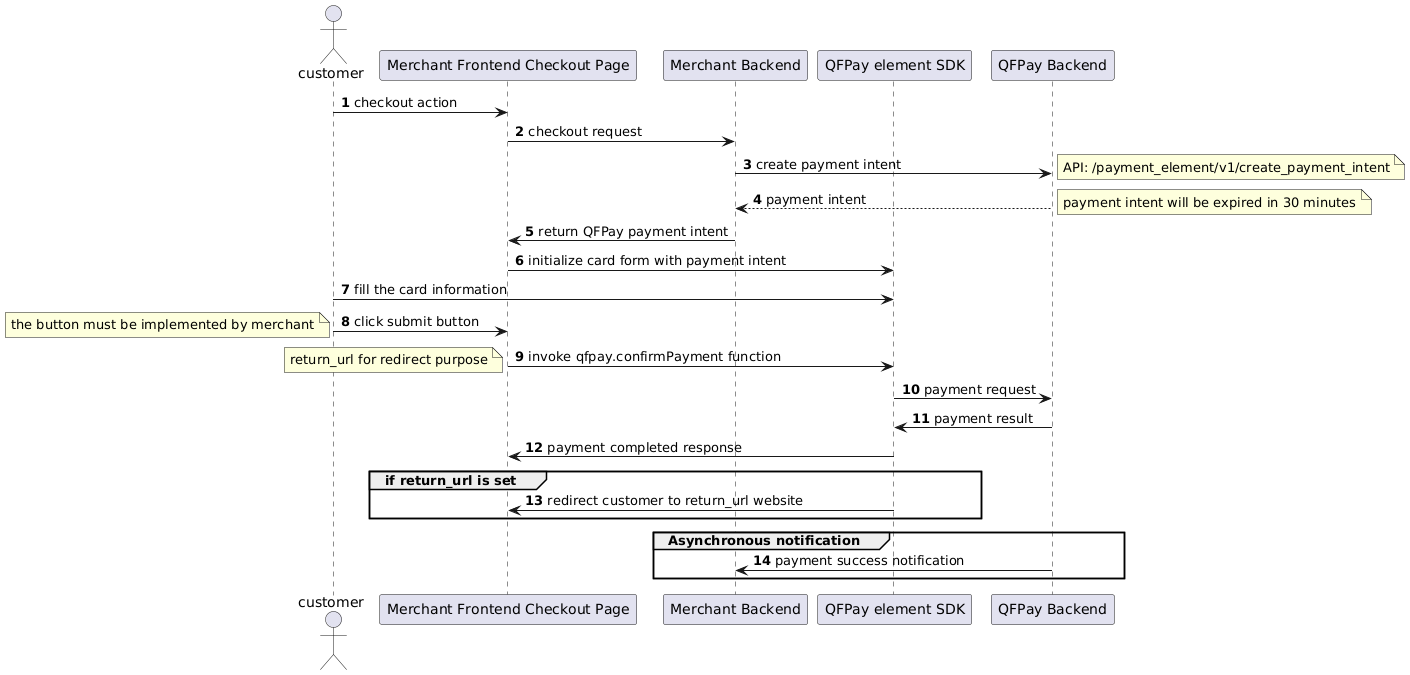
Flow Summary
- Create a Payment Intent via QFPay API.
- Initialise the SDK using
QFpay.config().
- Render payment UI (card form or wallet interface).
- Collect customer payment details.
- Confirm payment using SDK confirmation methods.
Supported Payment Methods
The Element SDK supports:
- Alipay (Mainland China & Hong Kong)
- WeChat Pay
- UnionPay / QuickPass
- FPS
- PayMe
- Visa / Mastercard
- Apple Pay
- Card Pre-authorisation
Step 1: Load SDK
Include the SDK script in your page:
<!-- Sandbox -->
<script src="https://cdn-int.qfapi.com/qfpay_element/qfpay.js"></script>

<!-- Live Testing -->
<script src="https://test-cdn-hk.qfapi.com/qfpay_element/qfpay.js"></script>

<!-- Production -->
<script src="https://cdn-hk.qfapi.com/qfpay_element/qfpay.js"></script>
Step 2: Initialise SDK
const qfpay = QFpay.config({
  region: 'hk',
  env: 'prod'
});
| Parameter | Required | Values | Description |
|---|
region | No | hk | hkt | qa | Region selection |
env | No | prod | test | qa | Environment selection |
qfpay object.
Step 3: Create Payment Intent (Backend)
Endpoint
POST /payment_element/v1/create_payment_intent
| Header | Required | Description |
|---|
X-QF-APPCODE | Yes | Store app code |
X-QF-SIGN | Yes | Request signature |
Parameters
| Parameter | Required | Description |
|---|
txamt | Yes | Amount in cents |
txcurrcd | No | Currency (e.g. HKD) |
pay_type | Yes | Payment type code |
out_trade_no | Yes | Merchant order number |
mchid | No | Required for agent setups |
return_url | No | Success redirect |
failed_url | No | Failure redirect |
notify_url | No | Webhook callback |
Response
{
  "respcd": "0000",
  "payment_intent": "38aec7ce...",
  "intent_expiry": "2026-01-01 12:00:00"
}
Step 4: Retrieve Payment Intent (Frontend)
const result = qfpay.retrievePaymentIntent();

if (result.code === '0000') {
  console.log('Payment intent valid');
}
const elements = qfpay.element({
  theme: 'night',
  variables: {
    colorText: 'black',
    colorPaymentButton: '#000000',
    colorPaymentButtonText: '#FFFFFF'
  },
  billingAddressDisplay: {
    city: true,
    address1: true
  }
});
Step 6: Render Payment UI
Wallet + Card Interface
elements.createEnhance({
  selector: '#container',
  email: true,
  tab: true,
  element: 'payment',
  lang: 'en'
});
elements.create('#container');
Step 7: Initiate Payment
Card Payment
payment.pay({
  goods_name: 'Premium Product',
  paysource: 'payment_element'
}, intentParams.payment_intent);
Multi-Wallet Payment
payment.walletPay({
  paysource: 'payment_element_checkout',
  out_trade_no: intentParams.out_trade_no,
  txamt: intentParams.txamt,
  txcurrcd: intentParams.txcurrcd
}, intentParams.payment_intent);
Step 8: Confirm Payment
Card / Apple Pay
const response = qfpay.confirmPayment({
  return_url: 'https://example.com'
});
Wallet Payments
const response = qfpay.confirmWalletPayment({
  return_url: 'https://example.com'
});
| Code | Meaning |
|---|
0000 | Success |
1111 | Apple Pay cancelled |
| other | Failed |
Step 9: Query Transaction
payment.inquiry({
  out_trade_no: intentParams.out_trade_no
}, intentParams.payment_intent);
Important Notes
If lang is not specified, the SDK uses the browser language.
Do not place the Element container inside a <form> element. Rendering will fail.
Payment intent expiry:
• Production: 2 years
• Sandbox: 7 days
Always generate signatures and create payment intents from your backend. Never expose secret keys in frontend code.